
…A Mini Tutorial: Quilting Your Own Fabric For The Oakley Vest
- The Oakley and Acorn Vests are on sale Friday, 3/8/24 for just $5 each! Remember to use code 10MARYMAC for an additional 10% off.
When we think about sewing up a vest, we often think about our Fall and Winter wardrobes. I realized that last Spring and Summer that I wore my light pink fleece Love Notions Oakley way more than I ever expected to! (You can see photos of it at the end of this blog post). It was then I that I decided that one of my first early Spring makes was going to be a new Oakley just for the warmer months!
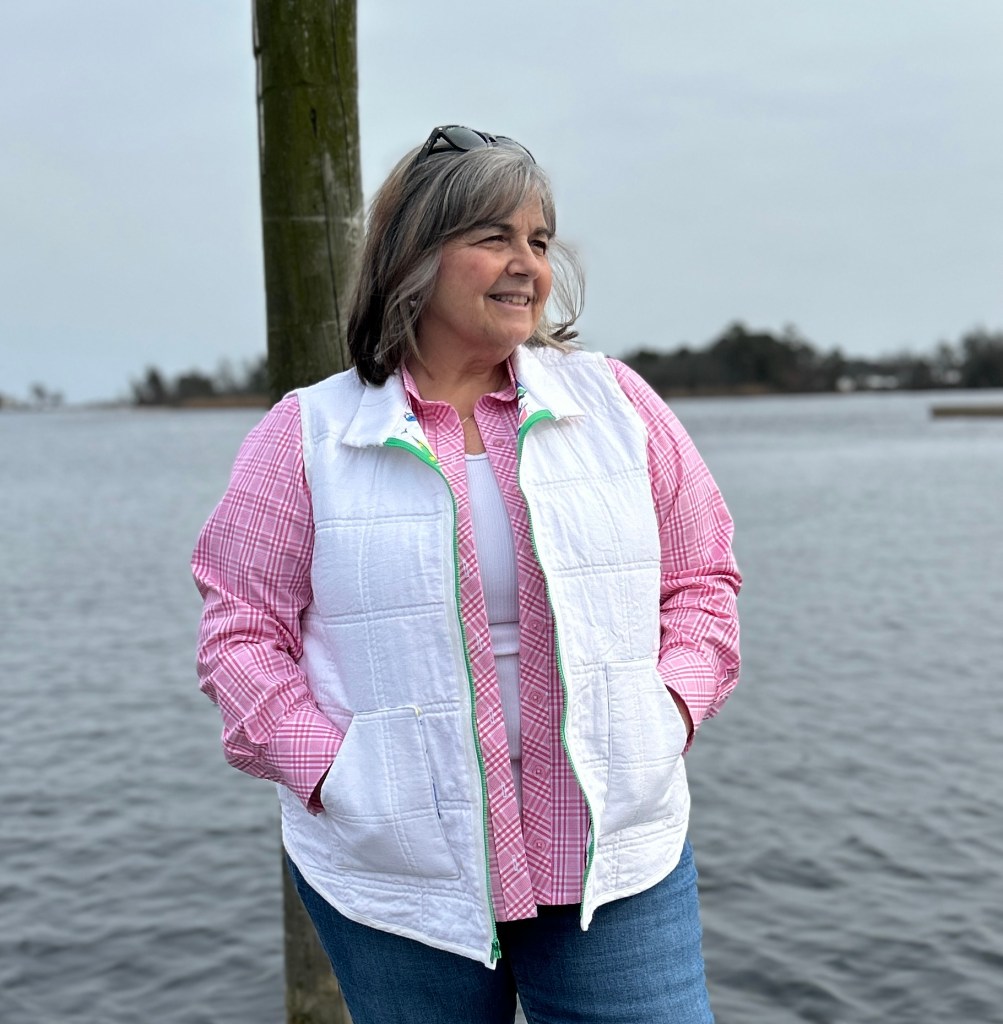


When I begin to plan my warm weather makes, I always lean towards my “go-to” colors: pinks, bright greens, navy and of course white. I also LOVE sewing and wearing linen during that time of year. So of course, I decided I wanted a white linen vest with a fun “coastal and preppy” lining. So I started by search for quilted linens~ and nope, there were none to be found. So I did what I needed to and quilted my own!


This Oakley blog post is dedicated to my new white quilted linen vest and how I created the quilted fabric. For more details on the Oakley Vest sizing, fit, and sewing tips, visit my original Oakley Vest blog post. You can find that blog post HERE.
How I Created My Own Quilted Fabric
What You Need
- Oakley Vest Pattern~ I used View B
- Outer Fabric (I chose white linen)
- Batting~ I used Warm & Natural Cotton batting
- Lining Fabric~ I used a custom printed cotton poplin
- Thread
- Large Safety pins
- Large ruler (a clear plastic one is easiest for this)
- Marking pen/chalk
- Walking Foot is highly recommended
NOTE: Please remember that I am NOT a quilter! If you are I ams sure you may have different ways of doing this.
Step 1: Prewash Fabric
I highly suggest washing both your outer and lining fabrics before quilting them. I know that a lot of quilters don’t do this, which is fine. Remember that this is a garment that you will be wearing so we don’t want it to shrink AFTER it’s all sewn! Note: if your fabric frays you may want to serge the edges prior to washing.
Step 2: Prepare Fabric For Quilting
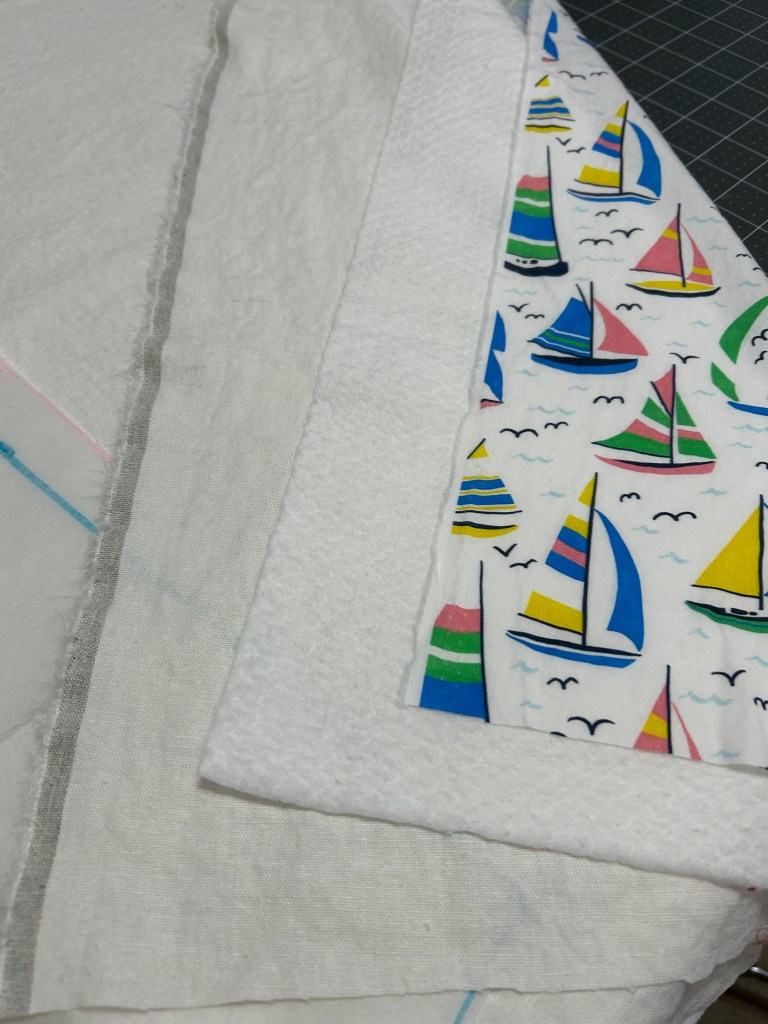
Rather than quilt my fabric as one large piece, I cut large rectangular pieces a few inches larger all around than my Oakley vest front and back pattern pieces. I cut the outer fabric, batting and lining fabric into these smaller rectangles. This was a much easier way to handle the fabric especially for someone who doesn’t quilt. I did the fabric for the pockets and collar differently. That will be explained later on. You will be making 3 large rectangles of fabric. You will have 2 smaller rectangles , one for each front and one larger rectangle that will fit your back piece(remember it must be big enough to fold and place the vest back piece on this fold.)
- Layer the main fabric, batting and lining fabric
- Use large safety pins to hold the 3 layers together
- Draw your quilting lines using a large clear ruler and marking tool. I started by drawing horizontal lines 2″ apart. I then drew vertical line 2″ apart. (I decided after quilting that I wanted more stitching so I added a second line next to each original one). You can draw diagonal lines or any other design you’d like.

Step 3: Quilting Your Fabric
- Stitch along your marked lines with a slightly longer stitch than you typically have your machine set to.
- Start at the center and work your way out to prevent “bubbles”.
- My machine has a built in IDT system that feeds the top and bottom layers of fabric more evenly. If you can, use a walking foot to help you do the same.
- Take your time! I couldn’t believe I actually found this step relaxing!
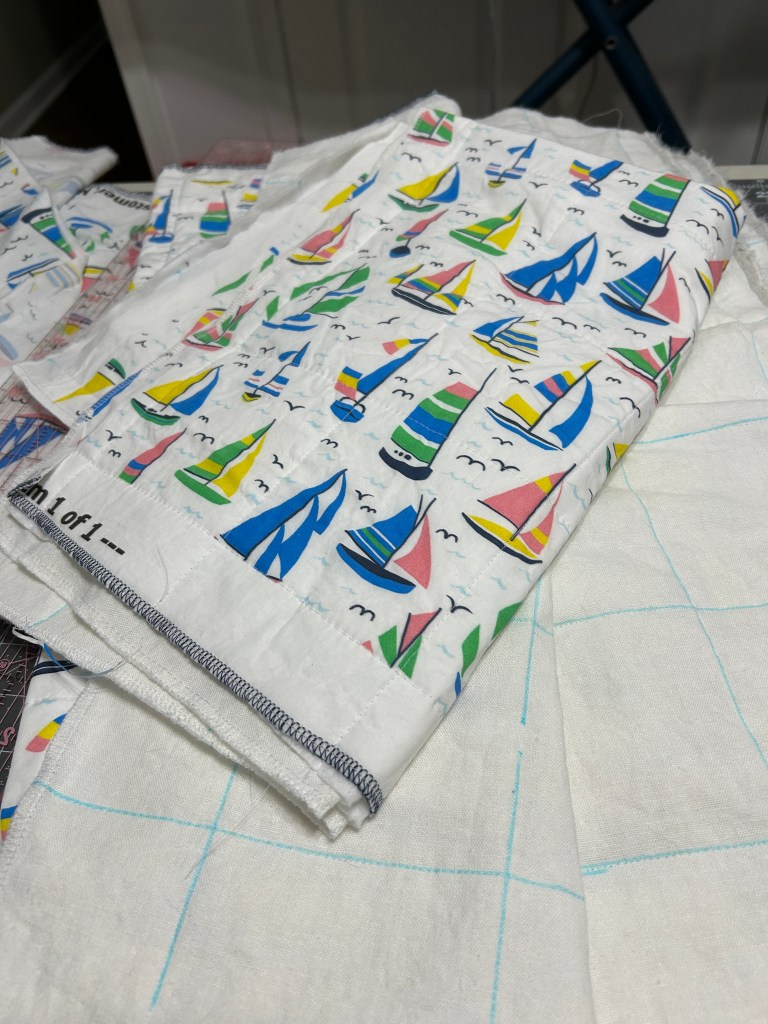

Step 4: Wash Your Quilted Fabric
- Wash your quilted large rectangular pieces again.
- Remember, we are making something to wear, and we really don’t want to put all this time in for it to shrink!
- Washing these pieces after quilting will you that “rippled” look of an old quilt.
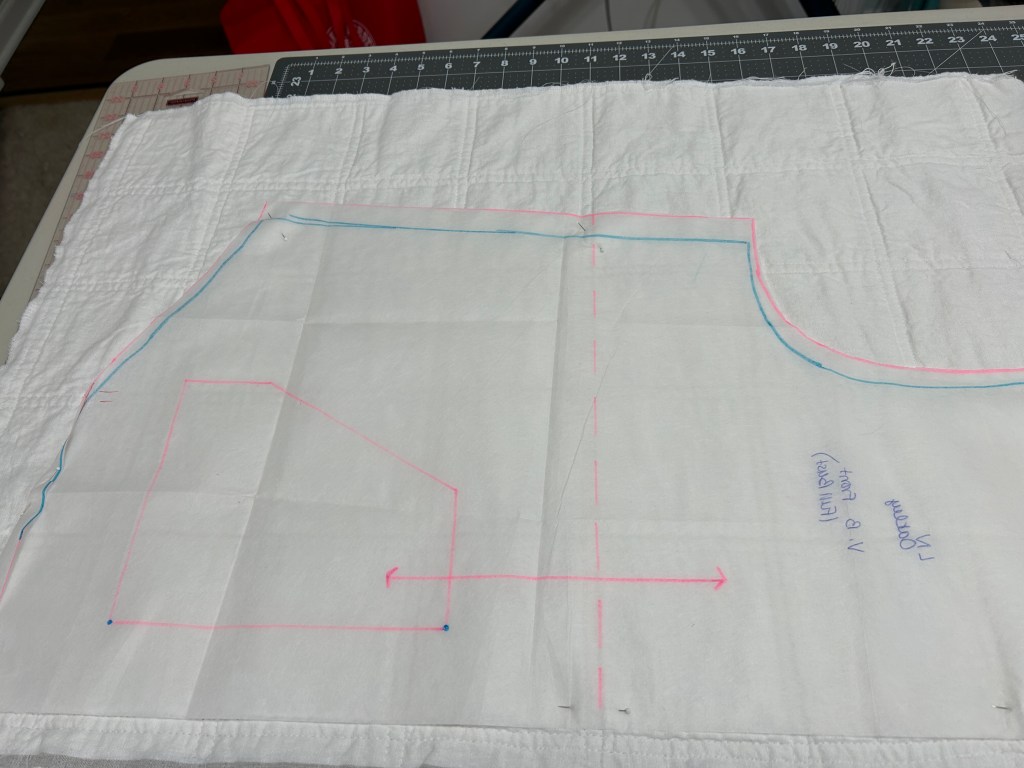
Step 5: Cut Out Vest Pieces
- Lay front and back pieces onto the quilted fabric and cut out.
- You should have 2 front and one back cut on the fold.
- Make sure your front pieces are mirror images of each other.
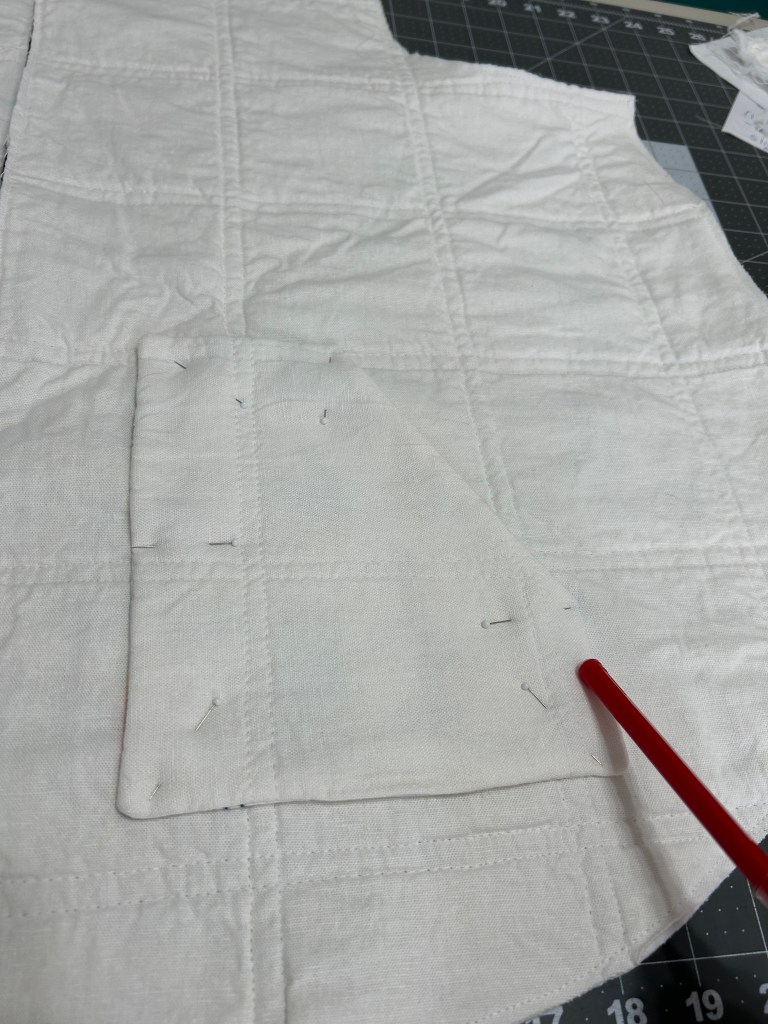
- After cutting, stitch around all sides of each quilted piece to hold everything in place.

Step 6: Pockets
- If you want pockets with bias binding around them (as seen on the pattern), you would prepare and quilt your fabric just like the body pieces above.
- I prefer to have a cleaner more classic/less sporty look by omitting the bias tape.
- If you plan on following my modification to have fully lined pockets, you will only layer the Main fabric with the batting for quilting. The lining fabric will not be quilted.
- Layer and quilt the Main fabric with the batting.
- Cut out 2 mirror image pocket pieces of your quilted fabric and lining
- IMPORTANT: You must cut your pocket pieces 1/4″ larger on ALL sides to make a fully lined pocket. Visit my blog post on the Love Notions Blog to see all the details of this pocket construction. You can find that blog HERE.
Step 7: Collar
I wanted my collar to lay open flat and not be too bulky. To achieve this I quilted the fabric as follows:
- Cut 1 long rectangular piece of your Main fabric and batting. (it needs to be long enough to eventually cut out 1 collar piece on the fold)
- Layer and then quilt the Main fabric and batting as you did for the body pieces
- Cut out one collar piece on the fold from your quilted fabric
- Cut out one collar piece on the fold from your lining fabric, this will be your undercollar.
- If you want both sides of your collar to be your main fabric you can use your main fabric for the undercollar.
- To sew the collar as I have with the zipper encased in the collar. Visit the Love Notions Blog linked above, for all the How-tos.


Sewing Your Oakley Vest
- Quilt all your fabric as instructed above
- Cut out all your pattern pieces as instructed above
- Construction details can be found on the Love Notions Blog for the collar, zipper and pocket modifications. See that blog post HERE.
- Other construction directions are in your Oakley Vest tutorial.


Thanks for stopping by! I truly appreciate all of you that visit! If you enjoyed this blog post, consider subscribing to my blog to stay up to date with all my posts! If you have any questions about this project, please feel free to reach out to me for help!
Mary Anne 🙂
Remember to follow me over on Instagram to see all my latest makes! @sewmarymac
You can also follow my Facebook Page~ Sew Mary Mac. On this page you will find information on my makes from all pattern companies. If I know of any good sales(pattern or fabric) I will also feature this information. I have had many of my loyal followers send me friend requests on Facebook. I do post in the Love Notions group under Mary Anne MacLean, however this Facebook account is private. There is no sewing content on that Facebook Account.
You can grab the Oakley Vest pattern HERE.
You can grab the Acorn Vest pattern for Girl’s HERE.
These are affiliate links. It costs you nothing to purchase from these links, it just helps fund my fabric addiction which allows me to test and review more patterns.
To receive an additional 10% off the pattern price, use this coupon code 10MARYMAC. This coupon code can be used at anytime on any pattern….even a $5 Feature Friday pattern. My code does change quarterly, so please always check the newest blog post for an update if you find a code isn’t working.
Resources
If you’re interested in some sewing tips for sewing with linen, be sure to visit my “Focus on Fabrics: Linen” blog post. You can find that HERE.
Outer Vest Fabric
The white linen fabric I used for the outer layer of my vest is Brussels Washer Linen by Robert Kaufman. Brussels Washer Linen is a blend of rayon and linen. It has the coolness and crispness we love from linen and the fluid drape of rayon. Talk about an awesome combination! It is one of my favorite fabrics to sew with.
Raspberry Creek Fabrics , Stylemaker Fabrics and several other online retailers sell this fabric. Brussels Washer Linen or BWL as it is often referred to can be purchased in solid colors and yarn dyed colors. At Raspberry Creek Fabrics you can also order custom designs printed on Brussels Washer Linen.
I purchased my white BWL from Stylemaker Fabrics. You can find it here.
Stylemaker Fabrics has 24 colors of BWL currently. You can find their complete collection of BWL HERE.
Vest Lining
The lining of my vest is a cotton poplin. I had this custom printed at Raspberry Creek Fabrics. Last year I had this design custom printed on rayon challis and sewed it up into a Rhapsody Blouse. I loved wearing this and always got so many compliments on it. I knew this print would be perfect for the lining of my vest. The great thing about custom printing is that you can select the scale of the design. I selected a slightly larger scale for this lining than I used for my Rhapsody Blouse. You can see the difference in the photos below.
You can find this Summer Sailboat Regatta print HERE.


Lower is Rhapsody in Rayon challis


Wasn’t going to buy this pattern as it’s not usually something I would think of wearing but I think ( since seeing yours) it’s a really versatile garment and definitely missing in my wardrobe. Really appreciate knowing how you constructed yours as I’m not a quilter either. Thank you.
LikeLiked by 1 person
Honestly I sewed my first up last year and couldn’t believe how often I grabbed it! I’m excited for Sping and the opportunity to wear this!
LikeLiked by 1 person