
The Saltwhistle from Love Notions
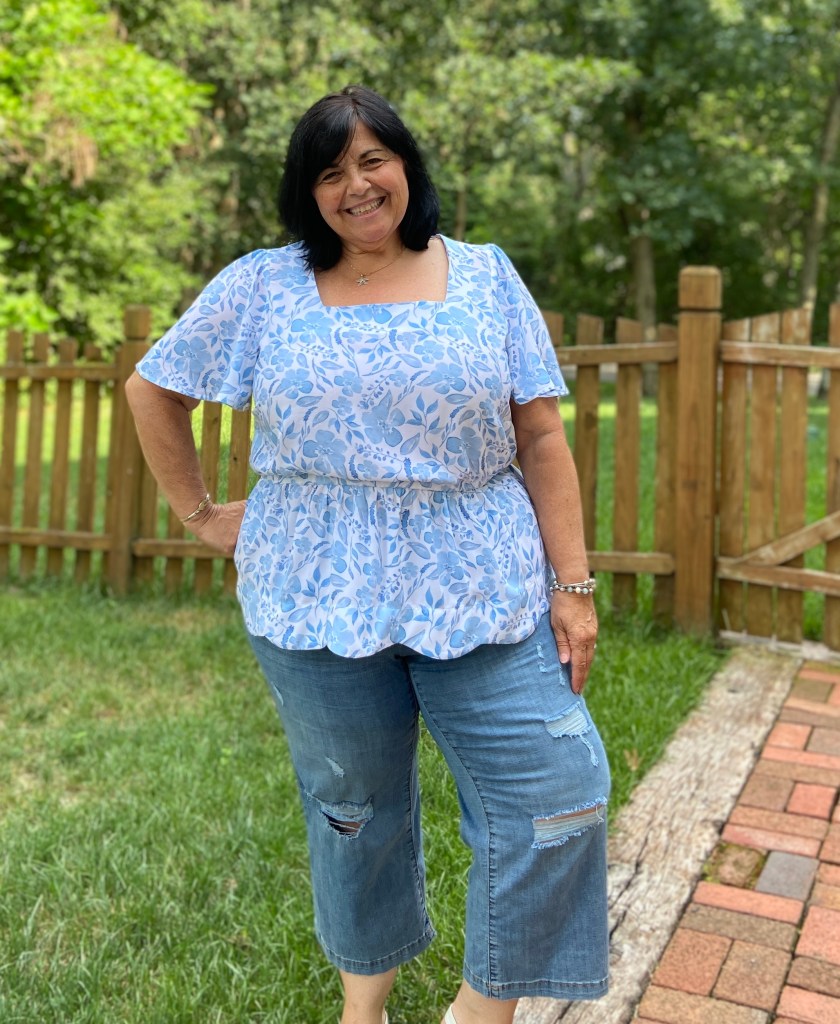
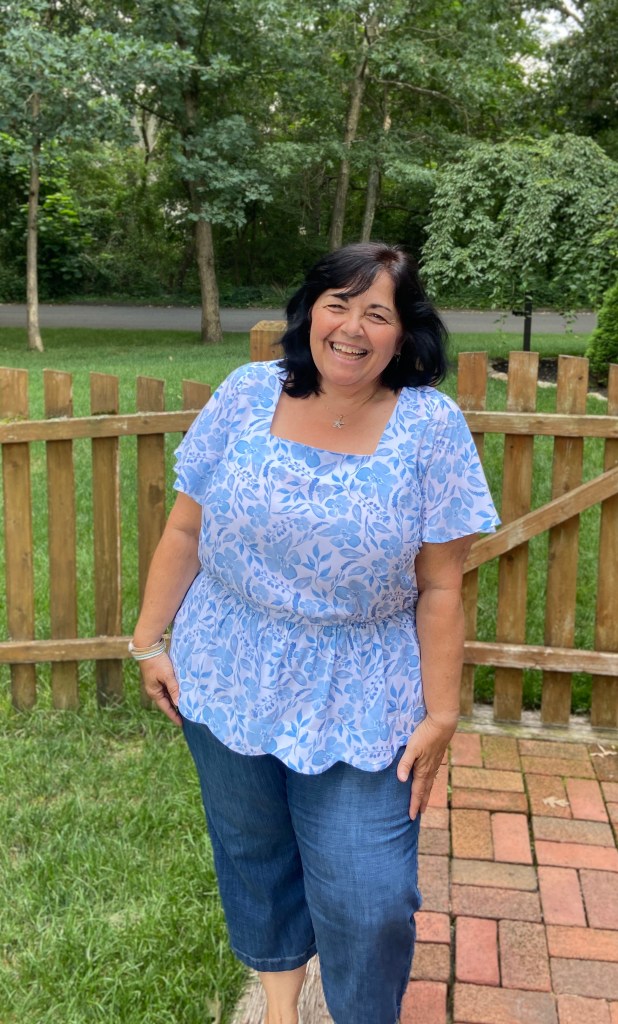
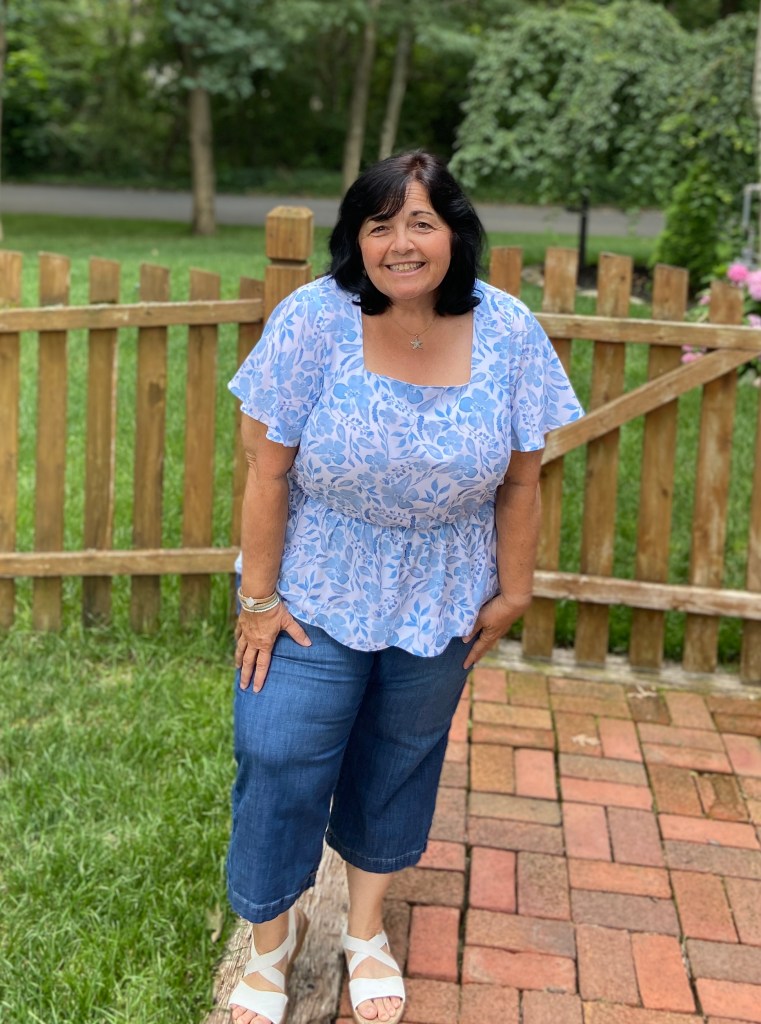
The Saltwhistle peplum top and dress is such a cute and flirty sew! It’s just perfect for summer( and Fall)! I didn’t test this pattern, but as a Love Notions Ambassador I was able to get my hands on it a few days early so that I could whip one up. In just a couple hours, I had this cute little summer peplum top with an adorable scalloped hem!

Details
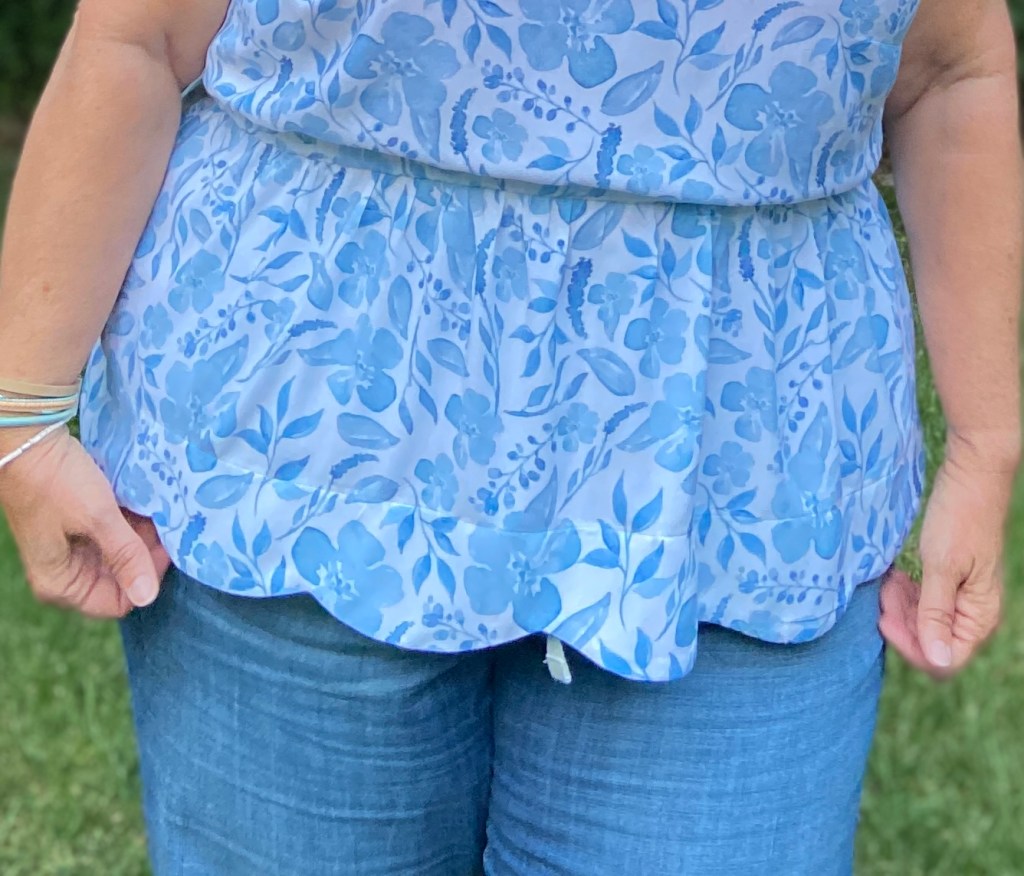
Believe it or not, the Saltwhistle is a quick sew that features an adorable square neckline and a classic scalloped hem. It can go from cute and flirty to business casual with the use of different fabrics.
Features
- Peplum or Knee Length Dress
- Square neckline
- 4 Sleeve Options: Sleeveless, Ruffle, Short Puff and 3/4 Bishop

I chose to make the peplum top with the short puff sleeves. I actually loved the way this looked on me, however after wearing it for the rest of the evening after taking photos I realized that elastic around that area of my arm really bugs me.
So, I took the sleeves off and recut a flutter sleeve. I used my Rhapsody flutter sleeve and the head of the bishop sleeve to create it. Immediately I was much happier with the feel of this sleeve. It worked much better for me. But, the more I looked at the photos of my 2nd version, I realized that I really like the gathering at the top of the sleeve head of the Puff sleeve.
So, I took the sleeves off once again and I made a flutter sleeve with additional height at the head of the sleeve to give me those gathers. To do this, I simply mashed the Rhapsody flutter sleeve with the Saltwhistle Puff sleeve. This is why I am “Team Trace” when I work with PDF patterns, I simply placed the 2 sleeves underneath a new piece of pattern tracing cloth and traced out a new sleeve.
I really love my new Flutter Puff sleeve! (I do think I’m going to shorten the sleeve just a tad.)

Sizing and Alterations
The Saltwhistle is available in sizes XS through 5X. A FBA front pattern piece is included in the fabric.
The Saltwhistle Top & Dress is designed to have a relaxed fit with ease at the bust and hip. Elastic at the waist pulls in and defines the waist for a flattering silhouette on all body shapes and sizes.
The peplum top is meant to hit around mid hip and the dress is meant to hit above the knee.
Be sure to choose your size based on your high bust. If your full bust minus high bust is more than 4″, use the full bust option.
*Note: Typically using the full bust option adds an additional 2″ to the finished hip measurement. This is NOT the case with this pattern. The peplum is a separate pattern piece, and the same one is used for the regular bust and full bust.

My high bust is 40″, therefore I started with the XL. Since my full bust is 4″ larger, I used the full bust option. My hips measure a 2X, so I graded out to that size for my hips. I am only 5 feet tall, but I chose not shorten this peplum top.(My high hip is very full, so I don’t like tops hitting me in that area~ hence why I didn’t shorten my Saltwhistle. Make sure you check the length on yourself, since you can’t shorten at the hemline. I did not need to make any other adjustments other than grading between sizes.
I typically have trouble with square necklines being too wide for me, but this square neckline was the perfect width for me. I did cut and sew the facing pieces together from scrap fabric first to determine if the neckline width would be okay for me. If you have narrow shoulders, or if this is an area you struggle with, I would suggest you do this as well. Square necklines aren’t always my friend~ but not only did this one fit nicely, when I bent forward there still wasn’t any gaping!! I demonstrated that below!!!
Typically the darts are always in the perfect location for me on all Love Notions patterns. I did find that this dart was a bit lower than it should have been for me. When I make this again, I will be raising the dart about 1/2″. I highly suggest checking the dart placement before you cut your fabric.
Fabrics and Notions
The Saltwhistle is designed for woven fabrics with drape. Fabrics such as rayon challis, voile, lawn, gauze, silk, crepe, chambray and lightweight linens would all work well.
My Saltwhistle is made from rayon challis from Raspberry Creek Fabrics. It is one of my most favorite fabrics to work with. RCF rayon challis isn’t as shifty as others that I have worked with. It has great drape, yet also holds a press really well. It worked perfectly for the scalloped hem! This fabric is still available for retail in the shop. You can find it HERE.

I have a very full high hip, so I often try to stay away from too many gathers over this area. For a pattern like the Saltwhistle, it was important for my body shape to have a fabric that was very drapey and fell softly over my hips. Keep this in mind when selecting your fabric.
Notions
- Thread
- fusible interfacing
- 1/2″ elastic for waist and puff/bishop sleeves
- Double fold bias tape, for waistline casing
- Single fold bias tape for ruffle or sleeveless options
Tips for Sewing Perfect Scallops
A scalloped hem can really elevate a simple garment into something special. Here are a few tips to get those scallops just right!
- Block fuse/cut your hem facings!! See below for details.
- Shorten your stitch length when sewing the scallops. This makes it so much easier to keep the correct curve of the scallops.
- Sew slowly!
- Sew to the inside “point” of the scallop, leave needle down, lift presser foot and adjust. Treat the scallop top “point” as you would corners~ don’t just try to stitch the curves.
- Trim seam allowance to 1/8″. Clip to the point between each scallop~ being careful not to snip through stitching.
- Use a smooth curved edge of a point turner (or the eraser end of a pencil) and slide it back and forth along the inside of each scallop. Do this a couple of times to really get the scallop shape.
- Press each scallop carefully. Place the tip of the iron between the peplum/skirt and the hem facing to press.
- Press again from the inside making sure the seam line is right along the edge.
- This is one of those times when pressing is really important. Remember that pressing is lifting the iron up and placing it back down, not gliding the iron across the fabric.
Block Fusing
What is block fusing? Block fusing is a garment industry technique that can make home sewing so much easier! Your interfaced pieces will in turn be much more accurate which is so important when working with collars, facings and plackets. I HIGHLY recommend block fusing the neckline and scallop hem facings on the Saltwhistle!
Block fusing is the process of cutting a block of fabric and interfacing the same size. The two are then fused together. Follow these simple steps.
- Cut a block of fabric and interfacing the same size.
- Fuse the interfacing to the wrong side of the fabric. Use lots of steam. It’s a good idea to use a press cloth as well. Remember to press and lift the iron~ do not slide the iron.
- Press the right side of the fabric as well.
- Cut the pattern pieces that require interfacing.
- Now you have perfectly accurate pieces to sew with.
Thanks for stopping by! I truly appreciate all of you that visit! If you enjoyed this blog post, consider subscribing to my blog to stay up to date with all my posts!
Mary Anne 🙂
Remember to follow me over on Instagram to see all my latest makes! @sewmarymac
You can grab the Saltwhistle pattern HERE.
This is an affiliate link. It costs you nothing to purchase from this link, it just helps fund my fabric obsession which allows me to test and review more patterns.
To receive an additional 10% off the pattern price, use this coupon code 10SEWMARY. This coupon code can be used at anytime on any pattern….even a $5 Feature Friday pattern. It never expires!!
I am currently a Love Notions Patterns Ambassador. I was given this pattern so that I could sew it up before it released. As always all opinions are my own.


Thank you again, Mary, for all the timely hints and tricks. Love that you comment on your height. I too am only 5 ft tall and what a challenge!
LikeLike
You’re so welcome! I used to think being 5 feet was a challenge- but the more I sew my wardrobe- and reuse my patterns- I’m finding it not an issue!
LikeLike
When I saw the pattern I bought it right away. I knew I wouldn’t do elastic in the sleeves and I wanted to do what you did. Flutter or a Tulip sleeve. So cute. I don’t usualy follow blogs, I prefer to watch youtube. Wish you had a channel.
LikeLike
I made the puff sleeve and knew after taking photos that I wouldn’t wear it like that- and I always love flutter sleeves. Sorry no YouTube for me (yet- who knows maybe some day). I guess after 32 years of teaching school- and always feeling like being “on camera” I haven’t gotten the bug to start one.
LikeLike
Thanks so much for your tips! This is such a cute pattern. I hope I get to try it soon!
LikeLike
I hope you make it soon- it’s so great for summer!
LikeLike
So pretty on you! I think the gathered sleeve head is more flattering, too. A flutter sleeve would work better for me than a short puffed one, as well. Thank you for the tip to cut and try the facing pieces for the square neckline first–what a great idea! I’m only 5 ft tall and usually need a smaller neck/shoulder size than the size needed for everything below. 🙂
LikeLike
Thank you! Sewing makes it so much easier to fit ourselves!
LikeLike